Manufacturing bill of materials (mBOM)
Editing the mBOM
The mBOM can be created/updated within the part library.

You are able to define only one bill of materials per part/revision. We recommend creating a new revision for the part if you have an update to the mBOM.
In addition to part and revision, the following attributes can be managed on the mBOM:
Made on Assembly (MOA): If true, it means that this assembly gets built on the same process with its parent. More on MOA here.
Substitutes: Parts that can be used interchangeably on this bill of material. This will allow other parts to be installed/kitted further down in the process.
Reference designators: Defined positions in the mBOM that you'd like to maintain during installation. More on reference designators here
Quantity: This is the minimum inventory quantity that needs to be installed to satisfy a build requirement on the aBOM. Suppose the mBOM quantity is set to 0. In that case, technicians can select untracked or lot-tracked inventory without selecting the installed quantity, which is ideal for consumables where only the trace information is relevant and not the quantity. Because the technician can always install more quantity than the requirement suggests, we recommend using this functionality for As-Required materials where you do not know the precise installed quantity in advance.
Consumables may include epoxies, kapton tape, or other cleaning materials.
As-Required materials may include carbon fiber layup and powder.
Here is a click through to see this in action.
Editing the mBOM by exporting the mBOM
You can click on Go to full mBOM above and choose to export the mBOM as a CSV, make your edits in the spreadsheet, and re-import your mBOM into ION.
The mBOM will export in Level notation, so when you import it, make sure you choose that option!
Importing the mBOM
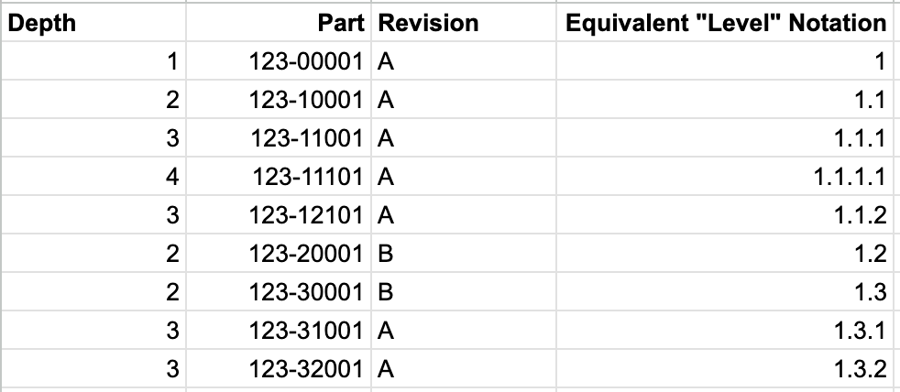
There are two options for importing BOMs - Depth Notation and Level Notation. With depth notation, if you accidentally disorganize your CSV file, you may have mBOMs that don't match eBOMs. See below for an example. The Equivalent "Level" notation is on the right hand side.
In this format, the level 1 is the top level, all the 2s are the next level down, 3s are the next level down from there, etc. But the order matters - if you moved the 3s underneath a different 2, the mBOM would change significantly. Therefore, it is important to make sure that your BOM is in the correct order and has not been rearranged since exporting it from your PLM/CAD software.
In Level notation, 1 is the top level assembly, and 1.1, 1.2, 1.3, 1.4, 1.5 are children of that assembly. 1.1.1 and 1.1.2 are children of 1.1, and 1.1.1.1 is a child of 1.1.1. See example below where the BOM was copied into the table as "manually imported data". Here you also have the option to import your parts via a CSV, TSV, or TXT file.
mBOM Importer Behavior
The mBOM Fast Importer handles draft Bill of Materials versions more predictably and transparently, with the following logic.
Behavior Overview
AlwaysCreateNewVersion = TRUE
A new Draft mBOM version is always created before importing.
Items from the CSV are imported into this new draft.
AlwaysCreateNewVersion = FALSE
If a Draft mBOM already exists:
The importer overwrites the existing draft, deleting all items in that draft and replacing them with the items from the CSV.
Missing CSV items are fully removed.
If no Draft mBOM exists:
A new Draft mBOM version is created and populated with imported items.
This update ensures mBOM imports behave consistently across organizations, preventing stale or duplicated draft data and giving clearer control over when new draft versions are created.
Faster mBOM import options
Because a fast option exists and is more reliable, the "Slow" importer will be deprecated by the end of 2025.
There are options to use a faster import that does not have preview capabilities, but will allow BOMs to be imported much faster than our standard options. Check out the below video for more information.
Substitutes
Substitutes should be in the format:
PartNumberA[X];PartNumberB[Z]
Where X and Z are the revisions for PartNumberA and PartNumberB
Transfer to the aBOM (As-built bill of materials)
When an inventory is created for an assembly with a serial number or lot number, that triggers an empty aBOM to be created from the mBOM. Each item in the aBOM maintains a link to each item in the mBOM and it's called the originMbomItemId. The aBOM uses this relationship to reach back to the mBOM for information such as substitutes and if the part is Made on Assembly.
Full visualization of the mBOM
Use the Go to full mBOM link to see entire mBOM in tree or indented views.

Last updated
Was this helpful?
